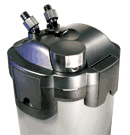
- Complete with Biological Filter - Adjustable surface skimmer (M200)
| UTC Modular Canister Filter w/ UV Sterilizer | |
|---|---|
VITALife M200 Model M200 Model Adjustable surface skimmer |
|
- Models:
-
Parts:
- Biological filter
- Mechanical/chemical filter
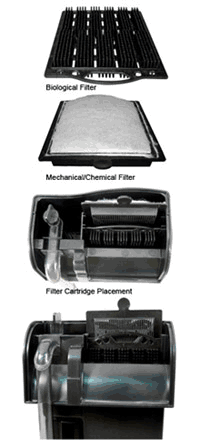
-
Installation:
- Place the VITALife
 Hang-On Back Filter on the back of the aquarium
 - Insert filter into the unit
- Fill the unit with water from the aquarium
- Place the filter lid on the unit
- Plug the VITALife
 Hang-On Back Filter system into the GFCI electrical outlet using a drip loop
 - Check for any leaks
- Place the VITALife
-
Maintenance:FILTER CARTRIDGES (every 3 – 4 weeks)
- Remove the filter cartridge and replace
- Bio-grid does not need to be replaced. Clean with aquarium water and place back into the filter. Do not clean with tap water as this will kill beneficial bacteria
IMPELLER (every month)
- Remove the filter from the aquarium
- Remove water
- Remove the pump
- Clean the impeller and shaft well
- With a small brush clean the inside of the impeller well
- Reassemble
- Apply a small amount of silicone lubricant to the o-ring and reinstall pump
- Follow installation instructions
INTAKE STRAINER AND INTAKE TUBE
Remove the intake tube and intake strainer and clean with a bottle brush
Specifications:
MULTI-SKIMMER II DELUXE DELUXE |
|
|---|---|
|
|
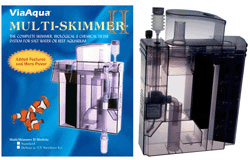 |
The UV Sterilizer is a 5 watt compact PL UV bulb surrounded by a quartz sleeve for increased efficiently and is enclosed in a replaceable high-density UV resistant plastic that drops directly into the UV-Bio Chamber of the Multi-Skimmer. UV light eliminates single cell floating algae and destroys most harmful microorganism providing a clear healthy aquarium. |
Models:
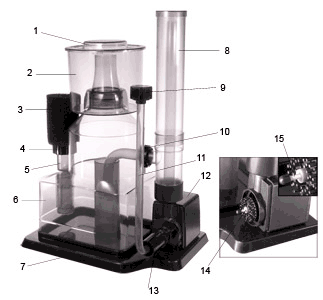
Parts:
- Primer and Silencer
- Variable venturi cover
- Variable venturi lock nut
- Variable venturi
- Main body
- Motor and impeller
- Pump cover
- Surface skimmer
- Intake tube and strainer
- Level Screw
- Leveling and secure screw
- Filter cartridge
- UV Sterilizer reaction chamber
- Filter cartridge cover
- Collection cup
- Water level control
- Ballast
- PL Socket
- Quartz sleeve
- PL UV bulb (5 watt)
Installation:
- Screw set to the center of the skimmer.
- Place the skimmer on the back of the aquarium.
- Tighten the set screw to secure the skimmer onto the back of the aquarium.
- Assemble the surface skimmer and intake strainer.
- The surface skimmer needs to be adjusted so that the water level is at the middle of the slots.
- Remove filter cartridge.
- Place water in the skimmer.
- Verify that the flow control is all the way open.
- Place the priming silencer onto the top of the variable venturi intake tube. The priming silencer needs to be threaded onto the top of the variable venturi intake tube. Now rotate the cap so that the hole on the top of the silencer is turned away from the green dot.
Option 2 for priming: Attach a 3-4 foot piece of airline tubing to the variable venturi tube and apply suction until the air is removed from the intake tube. - Plug pump into a GFCI electrical outlet.
- Now squeeze the priming silencer until all the air is removed from the intake tube.
- The motor will engage and start to pump water.
- Once water is discharging back into the aquarium open the air to the variable venturi tube by twisting the top of the priming silencer and aligning it with the green dot.
- Remove filter cartridge and place in skimmer
- Verify that there are not any leaks
Maintenance:
Replacement of the UV Bulb (UV model only)
The PL UV bulb needs to be replaced every 8,000-9,000 hours for optimum performance.
- Unplug all aquarium devices prior to working on the Multi-skimmer and/or aquarium.
- Remove the black reaction chamber from the main body of the skimmer
- Slide the out the top of the reaction chamber
- Remove the quartz sleeve
- Unscrew the top of the quartz sleeve
- Clean quartz sleeve
- Replace the PL ultraviolet bulb. Try not to have your hands come in direct contact with the bulb use a clean cloth to handle the bulb and install the bulb
- To insure a good seal add a small amount of silicone lubricant to the O-ring
- Hand tighten and reinstall.
Filter Cartridges (every 3 – 4 weeks)
- Remove the filter cartridge and replace.
- Clean with aquarium water and place back into the filter. Do not clean with tap water as this will kill beneficial bacteria.
|
Replacement
|
Replacement filter cartridges. |
| Replacement UV bulb. |
Specifications:
| An In-Sump Skimmer that comes ready to run out of the box. It features a large intake venturi, positive water level control, air control valve and a large base to remove micro bubbles. This skimmer is second to none. Priced to be affordable with the ability to make retail keystone margins. Simple to install and set up. User friendly for both employee and consumer. |
|---|
Models:
| Item No. | Dimension | Wattage | Capacity | UPC No. | |
 |
SK 200 | 13” x 8.5” x 15.5” | 35 watt | up to 150 gal. | 006903728249 |
 |
SK 388 | 14.5” x 9” x 17.5” | 45 watt | up to 250 gal. | 006903715218 |
Parts:
- Discharge sponge
- Variable discharge tube
- Discharge compression nut
- Main body
- Base
- Collection cup lid
- Collection cup
- Intake compression nut
- Air control valve
- 90-degree clear pump discharge tube
- Venturi intake tube
- Treaded pump adapter
- Venturi tube adapter
- Pump
Installation:
- Remove the collection cup and wash well with a mild detergent and rinse with hot water. Ensure all the detergent is removed from the collection cup.
- Fill the skimmer half way with salt water and place in the sump:
a. Place so that the discharge of the skimmer is the farthest from the return pump.
b. Sumps minimum water level is 5.5” and maximum water level is 9”. - Plug the pump into a GFCI electrical outlet.
- Place the collection cup on the skimmer.
- Open the Air Regulator 75% and adjust the variable discharge to ¾” form the bottom of the collection cup.
- Before doing any other adjustments to the skimmer let operate for a minimum of 1 hour.
- Now, the skimmer will either do the skimming properly, collecting water and no protein, or not skimming/collecting any protein. If the skimmer is not working properly, download the following instructions depending on the specific situation.
Note: The skimmer will not work without a biological load.
Maintenance:
MAIN BODY
- Disconnect the pump from the electrical outlet.
- Remove the skimmer from the sump.
- Remove all the water from the skimmer body.
- Remove the pump from the skimmer body. This is done by loosening both nuts and removing the 90-degree clear pump discharge tube. After slide pump from the base.
- Fill unit with water and add a small amount of bleach. Approximate a capful.
- Let stand for 1 hour.
- Rinse unit well and refill with fresh water.
- Add a water conditioner that removes chlorine to the water and let stand for 1 hour.
- Rinse well, reassemble, and install.
WATER PUMP AND VENTURI
- Disconnect the pump from the electrical outlet.
- Remove the skimmer from the sump.
- Remove all the water from the skimmer body.
- Remove the venturi tube and air control valve and run water through the unit so that water runs through air control valve.
- Remove the impeller well cover, impeller and shaft. Clean well. A small amount of vinegar should be used to clean the ceramic shaft.
- With a small brush clean the inside of the impeller well.
- Reassemble and install back into the sump.
DISCHARGE SPONGE
If sponge clogs, the water level in the skimmer will increase causing the skimmer to collect foam/water in the collection cup. Clean twice a month and replace when needed.
COLLECTION CUP
Clean as needed. Keeping the collection cup clean insures a properly operating skimmer.
- Needle wheel impeller with intake venturi
- No extra plumbing parts required
- Easy to regulate, install and maintain
- For aquarium up to 250 gallon
- Ready to run out of the box
- Compact and efficient design
- Discharge sponge
Specifications:
ViaAqua® In-Sump Skimmer 2 incorporates needle wheel technology with an exclusive U/D force through mixing tower for added contact time. The needle wheel and venturi intake tube create micro bubbles, which provide a tremendous amount of surface area to attract organics. The U/D mixing tower adds an additional 28” of contact time (14” up, 14” down). This contact time allows more time for organics to adhere to the surface of the micro bubbles. This unique feature provides the contact time of skimmers twice as large. Designed to be easy to set up and easy to regulate. Each unit comes with water level control and air volume control to ensure the ability to precisely tune the skimmer for maximum efficiency for any aquatic environment. The combination of design and engineering has created one of most efficient and affordable protein skimmers in the aquarium hobby.. incorporates needle wheel technology with an exclusive U/D force through mixing tower for added contact time. The needle wheel and venturi intake tube create micro bubbles, which provide a tremendous amount of surface area to attract organics. The U/D mixing tower adds an additional 28” of contact time (14” up, 14” down). This contact time allows more time for organics to adhere to the surface of the micro bubbles. This unique feature provides the contact time of skimmers twice as large. Designed to be easy to set up and easy to regulate. Each unit comes with water level control and air volume control to ensure the ability to precisely tune the skimmer for maximum efficiency for any aquatic environment. The combination of design and engineering has created one of most efficient and affordable protein skimmers in the aquarium hobby.. |
|---|
Models:
| Item No | Dimension | Wattage | Capacity | UPC No. | |
 |
SK 200 NW | 13” x 8.5” x 18” | 37 watt | up to 150 gal. | 006903729727 |
 |
SK 388 NW | 14.5” x 9” x 18.5” | 47 watt | up to 250 gal. | 006903729734 |
Parts:
Installation: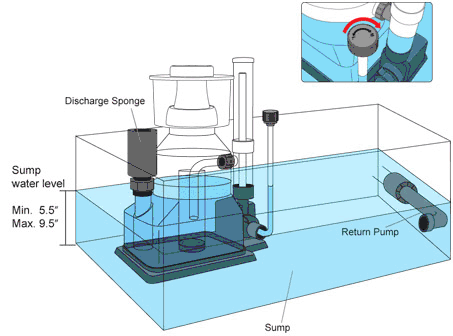
Maintenance:
MAIN BODY
- Disconnect the pump from the electrical outlet.
- Remove the skimmer from the sump.
- Remove all the water from the skimmer body.
- Disconnect the U/D mixing chamber.
- Remove the pump from the skimmer body.
- Fill unit with water and add a small amount of bleach. Approximately one capful.
- Let stand for one hour.
- Rinse unit well and refill with fresh water.
- Add a water conditioner that removes chlorine to the water and let stand for one hour.
- Rinse well, reassemble and install.
WATER PUMP AND VENTURI
- Disconnect the pump from the electrical outlet.
- Remove the skimmer from the sump.
- Remove all the water from the skimmer’s main body.
- Remove the venturi intake tube and air control valve. This will run water through the unit so that water runs through air control valve remove all salt deposits.
- Remove the impeller well cover.
- Remove the impeller and the shaft, clean well. A small amount of vinegar should be used to clean the ceramic shaft. Soak shaft in a 1 part vinegar to 3 parts water soluation for 30 minutes.
- Clean the inside of the impeller well with a small brush.
- Reassemble and install the unit back into the sump.
DISCHARGE SPONGE
If sponge clogs, the water level in the skimmer will increase and cause the skimmer to collect wetter foam/water in the collection cup. In a new tank it may be necessary to clean the sponge every week. Replace sponge as needed.
COLLECTION CUP
Clean as often as needed. At times the collection cup may have to be cleaned everyday. Keeping the collection cup clean ensures a properly operating skimmer.
Specifications:
|
||||
|---|---|---|---|---|
| ViaAqua® Modular Canister Filters are designed to be one of the most efficient water filtration systems on the market. The water is forced through large filter media containers eliminating water channeling and water bypass. The multi-stage filtering containers hold large amounts of filtering medias for maximum filtration. The stackable filter media containers come with a bio sponge and white polishing filter pad. The media containers can be filled with your choice of bio media, carbon and/or other resins. The motor has a build-in shut-off valve and quick release hose connectors, recessed water seal gasket and large lock clamps to secure the motor to the canister body. The ViaAqua® Canister Filter quietly and efficiently filters aquatic environments from 10 gal. to 240 gal. |
Models:Standard UTC Model
| Item No. |
Dimension |
Flow Rate GPH/LPH |
Volume | Wattage | Capacity Gallon |
UPC No. 0069037 |
| UTC-3200 | 13.2 x 13.2 x 18.8 in. | 581/2200 | 4.74 gal. | 55 watt | 80-210 | 2948 2 |
| UTC-3400 | 13.2 x 13.2 x 21.6 in. | 5.79 gal. | 80-240 | 2950 5 |
UVC Model with UV Sterilizer (5 watt)
| Item No. |
Dimension |
Flow Rate GPH/LPH |
Volume | Wattage | Capacity Gallon |
UPC No. 0069037 |
| UTC-3200UV | 13.2 x 13.2 x 18.8 in. | 581/2200 | 4.74 gal. | 63 watt | 80-210 | 2949 9 |
| UTC-3400UV | 13.2 x 13.2 x 21.6 in. | 5.79 gal. | 80-240 | 2951 2 |
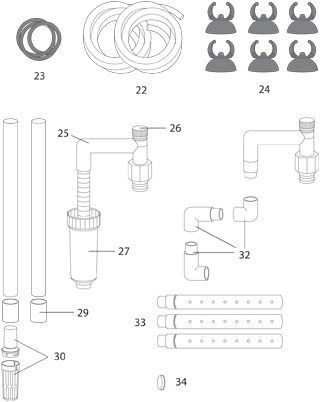
Parts (Standard):
|
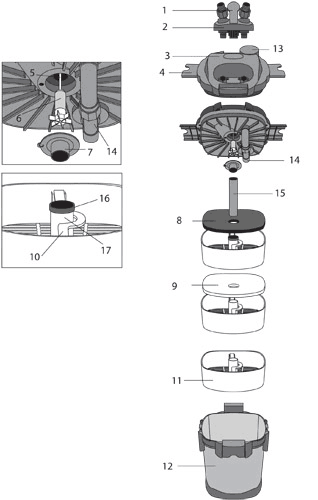
|
Parts (UV):
|
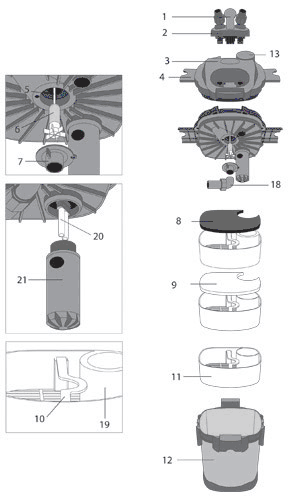
|
Installation: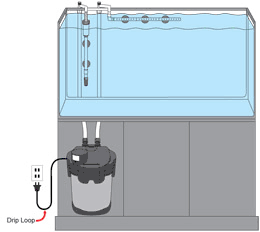
Maintenance:
To ensure optimum filtering and to maintain full water flow, regular maintenance is required. It is recommended to clean or change filtering media at least once every 4 weeks. Decreased water flow is a sign of clogged filter media.
- Unplug the unit from the GFCI outlet. Prior to maintenance on any electrical aquarium appliance or maintenance to the aquarium, you must disconnect all electrical aquarium devices.
- Remove valve/tap connectors from pump lid.
- If cover is removed without removing valve/tap connectors, water will siphon onto the floor.
- Remove the canister and place in an area suitable for maintanence.
- Flip out each of the four lid housing clips and release the pump motor housing. The motor housing cannot be lifted off the canister.
- Remove the filter strainer and remove the media containers one at a time using the handle. Note: The media containers need to be replaced in the same order as removed.
- Replace filter pads and medians.
- Clean the canister and impeller/impeller housing.
– Remove the impeller cover.
– Remove the impeller and shaft, clean with water. With a small brush clean the inside of the impeller well.
– Do not clean with soap.
– Reassemble. - Apply a small amount of silicone sealant to the gasket/O-ring to ensure a good seal.
- Install according to the directions for installation.


