|
Models:
| Item no. | MODEL | fountain head | Use for | Flow rate | UPC# 0069037 |
| FH-1 | 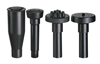 |
SMALL Fine head, two tier head, three tier head and water bell head |
ViaAqua PowerHead Pump, Pond Pump | 80-230 GPH | 2586 6 |
| FH-2 | 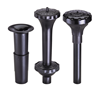 |
MEDIUM Three tier head, water bell head and dual tier head |
ViaAqua PowerHead Pump, Pond Pump | 370-1321 GPH | 2587 3 |
| FH-3 | 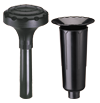 |
LARGE Three tier head and water bell head |
ViaAqua PowerHead Pump, Pond Pump | 800-2510 GPH | 2588 0 |
Parts:
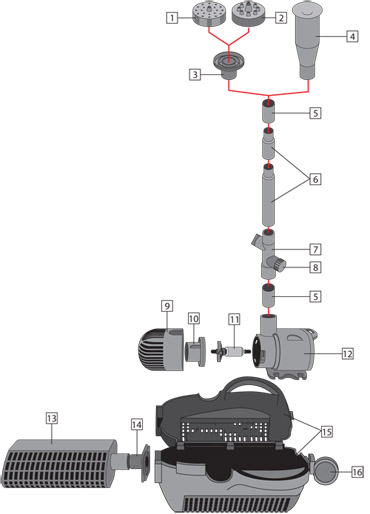
- Large Size:
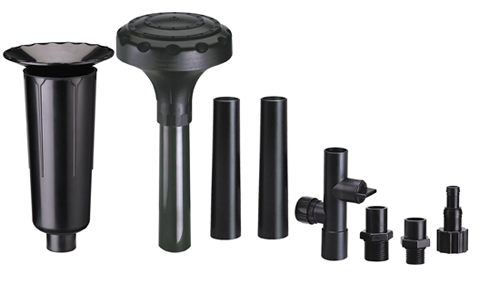
Fountain Head Three tier head
Water bell headUse for Model ViaAqua PowerHead Pump: VA3600, VA4900, VA8000
Hydrant Pump: MP5500, MP6500, MP7500, MP8500, MP9500
Pond Pump: DC-18000Flow Rate 800 GPH – 2510 GPH Application 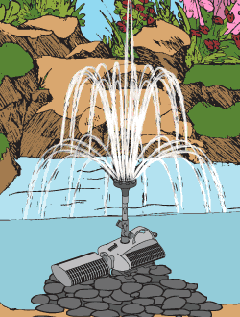
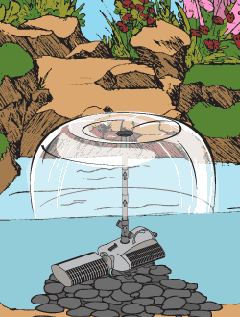
Three Tier Water Bell - Medium Size:
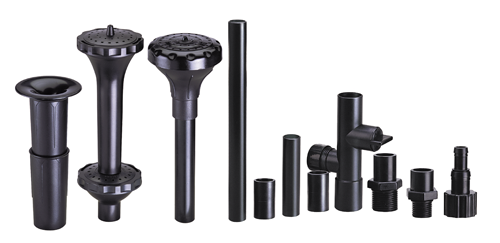
Fountain Head Three tier head
Water bell head
Dual tier headUse for Model ViaAqua PowerHead Pump: VA1300, VA1800, VA2300, VA3300,
VA3600, VA4900
Pond Pump: BH-2000ADFlow Rate 370 PGH – 1321 GPH Application Three Tier Water Bell 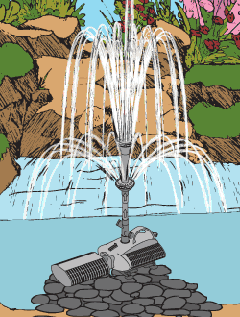
Dual Tier - Small Size:
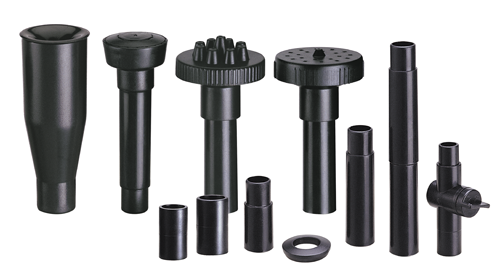
Fountain Head Fine head, two tier head, Three tier head
Water bell headUse for Model ViaAqua PowerHead Pump:
VA90, VA100, VA110, VA120, VA150, VA180, VA230, VA360, VA480, VA610, VA820
Pond Pump: BH-1000ADFlow Rate 80 GPH – 230 GPH Application Dual Tier Water Bell 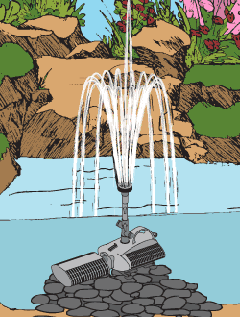
Two Tier Three Tier
Installation:
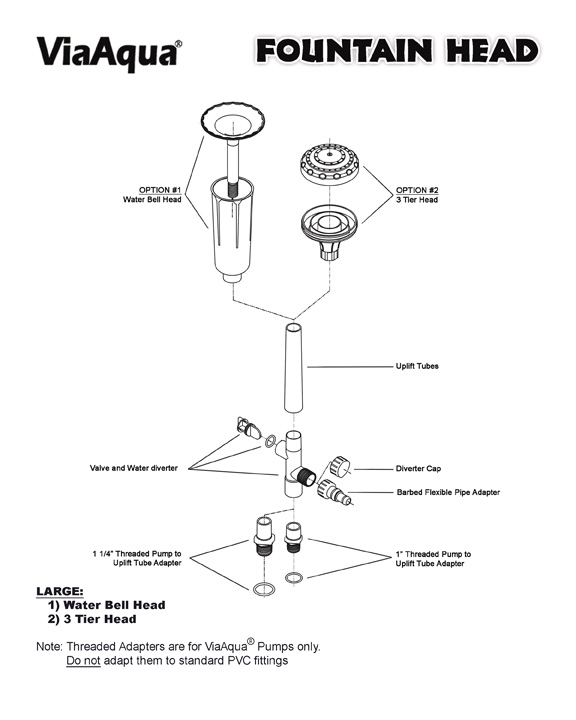
- Large Size:
Fountain Head Parts 1) Water Bell Head
2) Three Tier HeadNote Threaded Adapters are for ViaAqua Pumps only.
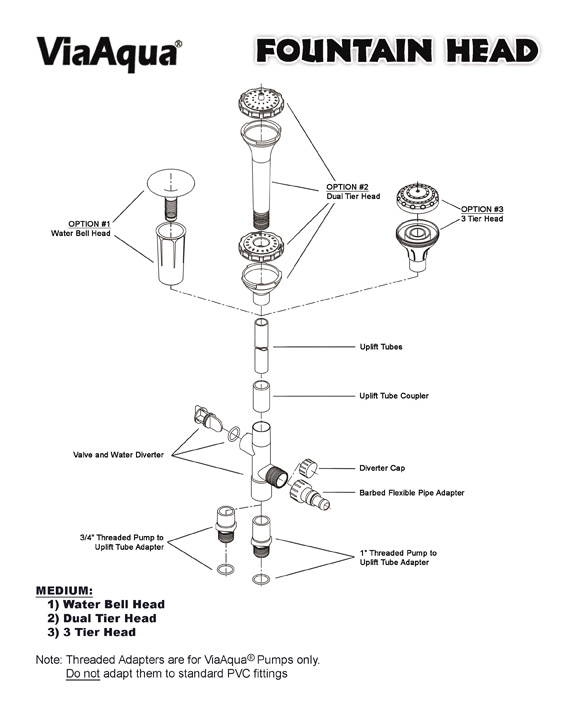
Do not adapt them to standard PVC fittings. - Medium Size:
Fountain Head Parts 1) Water Bell Head
2) Dual Tier Head
3) Three Tier HeadNote Threaded Adapters are for ViaAqua Pumps only.
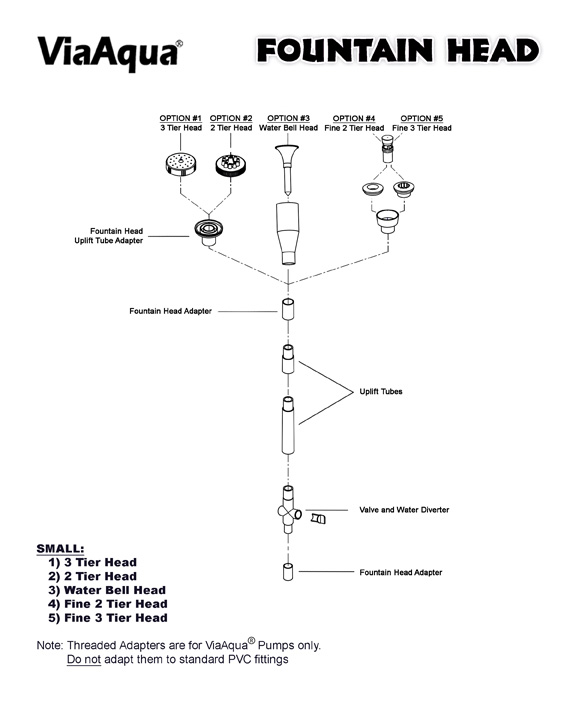
Do not adapt them to standard PVC fittings. - Small Size:
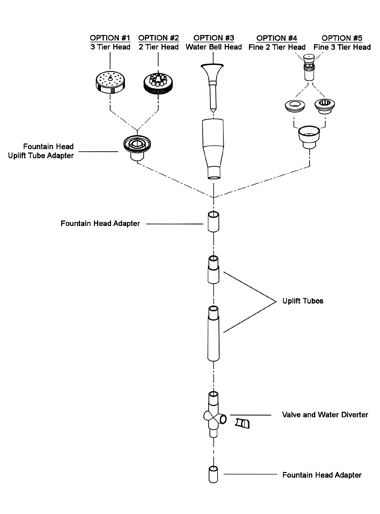 Fountain Head Parts1) 3 Tier Head
2) 2 Tier Head
3) Water Bell Head
4) Fine Two Tier Head
5) Fine Three Tier HeadNoteThreaded Adapters are for ViaAqua Pumps only.
Do not adapt them to standard PVC fittings.
Specifications:
| Item no. | Flow rate | max. head | wattage | UPC # 0069037 |
| BH 1000AD | 342 GPH | 3.93 ft. | 7.5 w | 2941 3 |
| BH 2000AD | 600 GPH | 4.92 ft. | 20 w | 2942 0 |
| BH 4000AD | 1105 GPH | 8.53 ft. | 46 w | TBA |
| BH 6000AD | 1579 GPH | 10.17 ft. | 74 w | TBA |
Parts:
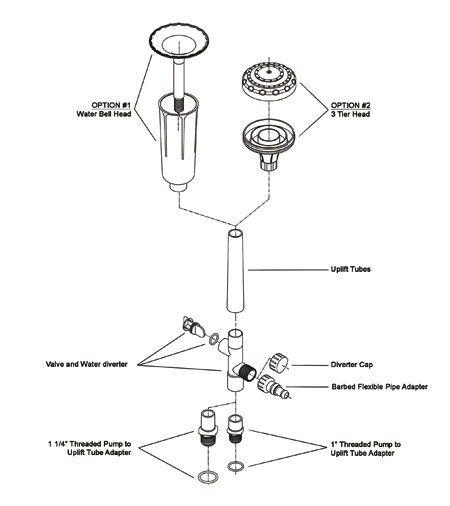
- BH 1000AD
-
- Three tier head
- Two tier head
- Fountain head uplift
- Tube adapter
- Water bell head
- Fountain head adapter
- Uplift tubes
- Valve & water diverter
- Diverter cap
- Pump strainer
- Impeller cover
- Impeller
- Pump
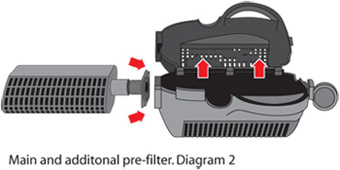
- Additional pre-filter
- Additional pre-filter bracket
- Main pre-filter
- Clasp
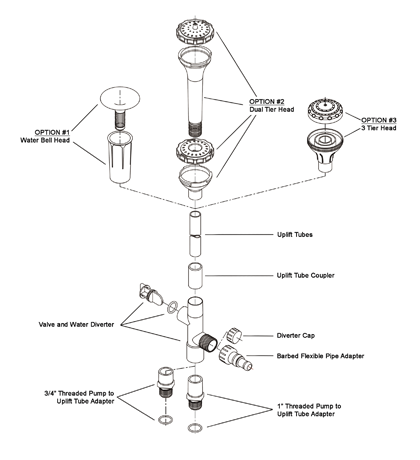
- BH 2000AD:
- Water bell head
- Dual tier head
- Three tier head
- Uplift tube
- Uplift tube coupler
- Valve & water diverter
- Diverter cap
- Barbed pipe adapter
- Pump strainer
- Impeller cover
- Impeller
- Pump
- Additional pre-filter
- Additional pre-filter bracket
- Main pre-filter
- Clasp

Installation:
|
 |
Maintenance:
| If the water flow decreases, it’s a clear sign that debris is in the impeller or the pre-filter is clogged. It is the hobbyist’s sole responsability to ensure the pump is maintained frequently. Failure to properly maintain the pump will cause premature damage to the ViaAqua® Pond Pump. Recommended routine maintenance: every 30 days.
|
Specifications:
| Item no. | Flow rate | max. head | wattge | UPC# 0069037 |
| DP 5000 | 1320 GPH | 5.2 ft. | 55 watt | TBA |
| DP 7000 | 1716 GPH | 6.56 ft. | 70 watt | TBA |
| DP 9000 | 1980 GPH | 8.85 ft. | 80 watt | TBA |
| DP 12000 | 2772 GPH | 13.12 ft. | 130 watt | TBA |
| DP 15000 | 3300 GPH | 14.76 ft. | 180 watt | TBA |
| DP 18000 | 3828 GPH | 21 ft. | 250 watt | 2966 6 |
| DP 20000 | 4356 GPH | 23 ft. | 350 watt | TBA |
Parts:
|
 |
Installation:
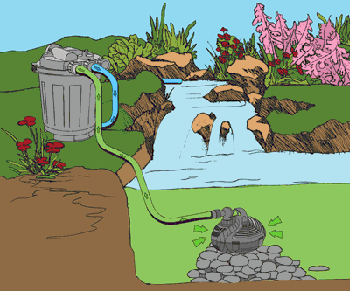
SUBMERSED
- Place pump in the desired location. If pump is placed in a pond, raise the pump off the bottom of the pond by a minimum of 6 inches.
- Use Teflon tape to connect the universal elbow or coupler to the output of the pump.
- Place the o-ring onto the barbed pipe adapter. Then, use the Teflon tape to hand tighten the barbed pipe adapter to the universal elbow or coupler. See diagram A.
- Connect the flexible tubing to the barbed pipe adapter. Ensure water tightness with a hose clamp.
- Connect to filtration or water feature.
FOUNTAIN HEAD
- Place pump in the desired location. If pump is placed in a pond, raise the pump off the bottom of the pond by a minimum of 6 inches.
- Use Teflon tape to connect the universal elbow or coupler to the output of the pump.
- Install the fountain head properly. See details in diagram B.
- The diverter valve enables water flow to be directed to either a water feature, TerminatorTM UVC Sterilizer, or a pressure pond filter.
Maintenance:
If water decreases, it is a clear sign that debris is in the impeller or the pre-filter is clogged. It is the aquarist’s sole responsability to ensure the pump is maintained. Failure to properly maintain the pump will cause permanent damage to the pump.
- Recommended routine maintenance: every 30 days.
- Tools required: Philips screw driver.
- Disconnect the pump from the GFCI (Ground Fault Circuit Interrupter) power supply prior to removing the pump from the water.
- Release all four latches from the pre-filter. Rinse all the debris out of the pre-filter.
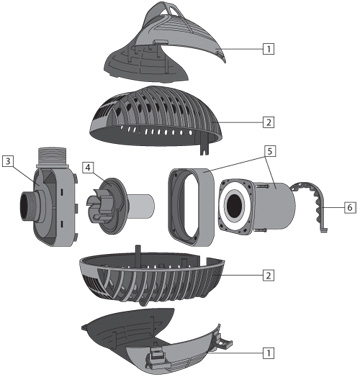
- Remove the C-clamp.
- Loosen the four large screws on the volute. Then, remove the volute.
- Once the volute is removed, clean it well.
- Remove the impeller and clean it well. Verify the impeller is free of all dirt and debris.
- Once cleaned, place the impeller back into the motor. Guide holes on the impeller plate, so they match with the pins on the volute. The impeller should sit flush on the volute.
- Reassemble. If necessary add a small amount of silicone lubricant to the gasket in the volute to ensure a proper seal.
- Start the ViaAqua® Multi-Duty Pond Pump
 .
.
Specifications:
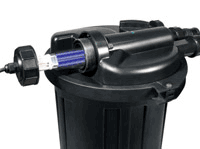
| PRESSURE POND FILTER with UVC Sterilizer The ViaAqua® Terminator UVC Sterilizer features a PL bulb. The sterilizer uses a quartz sleeve to maintain the bulb temperature, thus allowing 95% of the UVC radiation to sterilize the water. The internal burning chamber is designed for maximum contact time, which produces more UVC radiation than comparable UVC units. The increased of contact time exposes virtually all organic, single celled algae and eradicates the most harmful microoganisms. |
|
|
TERMINATOR
|
 |
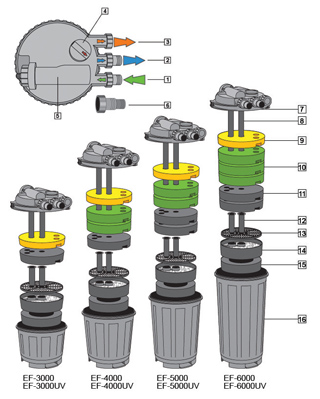
Models:
| Regular Model | |||||||||||||||||||||||||||||||||||||
|
|||||||||||||||||||||||||||||||||||||
| UVC Model with UV Sterilizer | |||||||||||||||||||||||||||||||||||||
|
Parts:
|
 |
Installation:
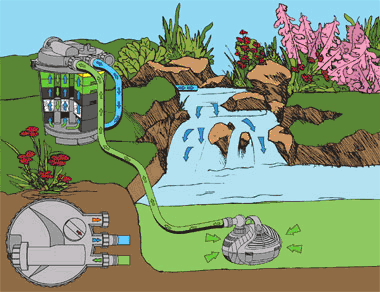
| TYPICAL OPERATION For proper filtration, operate the pressure pond filter 24 hours a day, year round. |
|
|
|
| BACKWASH OPERATION |
|
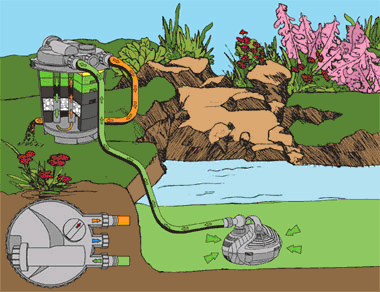 Backwashing filter should be performed at least once a week. The filter needs to be cleaned when: – Dirty/cloudy water is in the filter. – Reduced water flow. |
Maintenance:
FILTER SPONGES
When backwashing, if the filter does not produce expected results, it is necessary to clean or replace foam media. This should be performed at least once a season. However, this is not a rule for pond and outdoor environments vary thus more frequent cleaning may be required.
- Unplug the Terminator UV Sterilizer and turn the pond pump off.
- Disconnect the barbed fitting from the filter.
- Flip out safety lock and remove lid retainer clamp.
- Remove the lid of the filter. Handle with care. The UV bulb and quartz sleeve is made of glass.
- Remove the intake and output flares.
- Remove and rinse foam pads. Replace them if necessary.
- Remove the bio-chamber and rinse well with pond water only. Biological media beneficial bacteria will be killed if tap water is used to rinse.
- Remove and rinse pre-filter foam pads. Replace them if necessary.
- Rinse and clean the filter body.
- Place the filtering media back in their original locations. Replace intake and output flares.
- Replace o-ring and verify that it is clean. We recommend using a small amount of silicone lubricant on the o-ring to ensure a proper seal.
- Secure lid with lid retainer clamp. The lid retainer clamp must be aligned so that the notches in the top of the clamp fit under the intake and discharge port.
- Filter is ready to use. See installation instructions.
REPLACEMENT OF UV BULB (UV Model)
- Follow all the safeguards and warnings of the manufacture.
- Before doing any maintenance on the UV sterilizer, the power supply and water supply must be disconnected.
- Only in rare situations does the quartz sleeve ever have to be removed. If necessary loosen screws carefully, then remove the quartz sleeve. If excess force is used the quartz sleeve will break. After removed, use a soft clean cloth to gently remove any excess grim and/or debris. Reassemble using a small amount of silicone lubricant placed on the o-ring prior to sliding it into the main body of the UV sterilizer.
- The UV bulb needs to be replaced every 8,000 to 9,000 hours. This will ensure optimum performance.
- The efficiency of the Terminator UV Sterilizer depends on the duration the UV light is in contact with water. Thus the rate of water flow, not the way the water travels, will relate to the efficiency of the UV sterilizer.